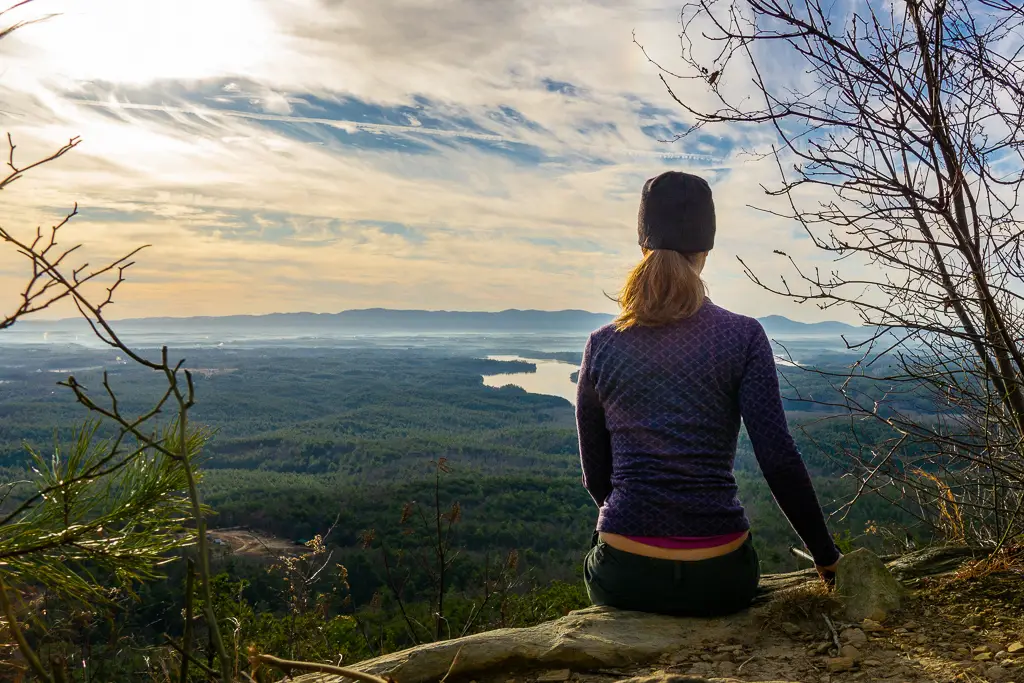
You’ve got all the gear. You’ve planned the perfect route and trained for weeks to get in shape. You’re all ready for your first backpacking trip. The only problem? You have no one to go with. It’s time to arm yourself with some essential solo backpacking tips so you can hit the trail all on your own!
Before I undertook my first solo backpacking trip, my friends tried to convince me it was a terrible idea. What if I ran into someone sketchy? What if a bear visited my campsite? Or what if I got lost or injured? It was almost enough to convince me not to go.
Of course, none of those things happened. (Well, I did get lost, but it wasn’t a big deal.) The biggest thing that went wrong was I carried a little too much weight. Instead, I discovered how incredible it is to spend the night in the woods, taking in the sounds of nature, having an epic sunset all to yourself. At the same time, hauling myself-plus-35-pounds-of-gear 30 miles up four 6,000-foot peaks was one of the most empowering experiences of my life. Now I go solo backpacking about once a month — and I’ve still never run into any real dangers.
The truth is, going backpacking alone can be a safe, affordable, and enjoyable vacation — if you’re prepared. In this post, I’ll walk you through everything you need to know to plan your own epic hiking journey.
Note: This post may contain affiliate links. If you decide to purchase through these links, I receive a percentage of the sale at no additional cost to you.
First, a caveat to these solo backpacking tips
I’m writing this post from the perspective of a cis White woman who has solo backpacked mainly in the American South. My race, gender identity and nationality give me a level of security and privilege that BIPOC women and queer-identifying folks don’t have.
This post is based on my first-hand experience solo backpacking and the level of safety I feel in my context. It is certainly not a universal perspective.
For insight into the experiences of solo Black female backpackers, I’d highly recommend reading Rahawa Haile’s take on solo backpacking the AT as a queer Black woman. And while you’re at it, follow Elsye Chardonnay Walker, Amanda “Zuul” Jameson, and Teresa Baker on Instagram.
Additionally, I would not feel safe backpacking solo outside the U.S. and maybe Canada. Even if I felt fairly confident with the trail, I just don’t know enough about the search and rescue infrastructure or trail culture in other places to be confident in my safety.
How to prepare for backpacking alone before you hit the trail

When you’re alone on a backpacking trip, you have to rely completely on yourself. So it goes without saying that one of the keys to a successful trip is being prepared.
But it’s a tricky balance. Unlike with car camping, you can’t stick everything you might need in your backpack for all those “just in case” scenarios. You have to literally weigh the benefits of everything you bring.
Some of the preparation comes in the form of gear. Some comes in the form of training and physical preparation. And some of it comes down to mental preparation — knowing what to expect when a twig snaps inches outside your tent at 2 am on a freezing-cold night. (Short answer: It’s terrifying. It never stops being terrifying, no matter how safe you are and how many times you’ve heard it. But you kind of get used to it.)
If you follow these simple steps, you’ll put yourself in the best possible position to enjoy yourself and not worry too much on the trail.
1. Choose where to go for your solo backpacking trip

Let’s start with the fun part — deciding where to go. This is where you daydream what your days on the trail will be like and where the perfect camping spots are.
Since this will be your first foray into the backcountry by yourself, one option is to pick a route you know well — or at least an area you’ve been to before. You’ll have some sense of where the campsites are, what the terrain is like, and how hard it is to navigate.
If you don’t live in an area with lots of backcountry camping, another alternative is to choose a popular and well-known trail. For example, you don’t have to have incredible navigation skills to navigate a weekend of backpacking on the Appalachian Trail — it’s extremely well-marked and there are shelters every few miles where you can camp. National parks are good options for a first backpacking trip, since you often reserve backcountry permits in advance (so you’re guaranteed to know where you’ll land each night).
On the other hand, I would not recommend backpacking solo for the first time in a federal wilderness area you’ve never been to before, since the trails are all unmarked and the terrain can be extremely rugged.
2. Plan your itinerary and choose your camping spots

One of the beautiful things about backpacking alone is you can set your own pace. You can push through big-mileage days or spend most of your time chilling at camp. There is no right or wrong option — it’s all about what you like.
The flipside is one of the key safety protocols for hiking alone is to pick an itinerary and stick with it. While it can be tempting to press on another few miles at the end of the day, no one will know where to look for you if you get lost. So planning the right itinerary for your first trip is crucial.
To start with, choose a route that you know is solidly within your ability level. This is not the time to push yourself for 20-mile days or aim for 5,000 feet of elevation gain. In fact, if you want to give your gear a test-run and decide if you enjoy backpacking solo, try hiking 2-3 miles in from a trailhead and camping there. Then hike out the next morning and treat yourself to a delicious brunch!
If you want to start with something a bit more intense, that’s fine too. But stick with a 2-3 night trip. You can always go for longer once you’re more familiar with your gear and food weight.
Once you know how many miles you want to cover in a day and how many days you’ll be hiking, it’s time to start researching campsites. If you’re in the Eastern U.S., Hiking Upward usually has fantastic campsite details for even the most remote treks. Commenters on AllTrails often leave reviews stating where they camped. If you’ve day-hiked in the area before, make notes of where you’ve seen campsites. Or, just start Googling!
The other big itinerary consideration is water sources. Again, AllTrails and Hiking Upward are good sources of information — but also look at a topographical map and do some research into weather to ensure streams aren’t running dry.
Choosing a perfect campsite
As you’re researching where to camp, you’ll need to decide what kind of atmosphere you want.
The first big question is whether you want to be totally-solo or if you want to be in the vicinity of other backpackers. Personally, as a solo female backpacker, I always feel more secure with a handful of other people nearby. I tend to avoid AT shelters because they’re too crowded, but I love camping on Southern Appalachia’s grassy balds where even huge crowds can spread out.
Another consideration is water sources. Backpacking is so much easier when you have water at camp. It means you don’t have to lug cooking water around, and you can fill up first thing in the morning for the whole day. But you’ll rarely find water on ridges, which tend to have the best sunrise/sunset views.
If you are planning to camp on a ridge, make sure you have a backup plan in case of stormy weather. Lightning storms on an exposed ridge are extremely dangerous. You’ll want to be well below the treeline if storms are in the forecast. Additionally, ridges can be colder, windier, and wetter than just slightly below, so make sure you have weather-appropriate gear.
Regardless of where you camp, always practice leave no trace principles by choosing an established campsite rather than clearing your own.
Finally, in some areas, it might not be super safe to camp within one mile of a road. Campsites near roads are often “party campsites” that attract sketchy characters. Of course, use your judgement if you’re familiar with the area — where I live in Western North Carolina, I know which roadside campsites are family-friendly and which ones attract meth-heads (*cough* Davenport Gap *cough*). But if you’re traveling for your first time backpacking by yourself you may not be able to gauge this.
3. Get in shape

I’m a firm believer that just about anyone with good knees and feet is capable of backpacking. You don’t need to be a fitness rockstar to enjoy a couple nights in the woods.
That being said, backpacking is definitely more fun if you’re in shape for it. And I mean specifically in shape for backpacking — if you’re generally fit, you may still find carrying 30 pounds on your back up and down mountains wipes you out. You will enjoy the mountains more if you can focus on the scenery rather than on how sore your legs are.
The best way to train for backpacking is, well, by backpacking. Start out with day-hikes with a day-pack and gradually work your way up to carrying your backpacking pack. Then, start filling your pack with a little more weight at a time. When that feels easy, head out on back-to-back day hikes with approximately the amount of weight you plan to carry on your overnight. My hiking training plan has more details.
One of the most important solo backpacking tips is to train in an area similar to where you’ll be backpacking. So if you’ll encounter high elevation on your overnight, do some day-hikes at high elevation. If you’ll have to hike through snow or pouring rain, do some day hikes in snow and pouring rain. If you expect to encounter rushing river crossings, practice with a much lighter pack.
As you start training, you’ll start to notice what works and what doesn’t. A few things to pay attention to:
- How much do you need to eat to keep your energy levels up?
- What layers do you need to minimize clothing weight while staying warm and dry?
- How tight does your backpack waist belt need to be? How much weight do you want in your hip vs. your shoulders?
- Do your feet feel good? When you’re carrying weight, do you need to invest in insoles that provide better support?
- How does your pace change when you add weight?
Make adjustments and go for another day-hike. When you feel fully comfortable with both your gear and your fitness level, it’s time to book your trip.
4. Research permits, transportation, parking, and other trip logistics

Backpacking is a pretty logistically simple activity — you show up to the trailhead, you hike, and you sleep wherever you want. But some areas require a bit more planning.
In many U.S. national parks and state parks, you need a permit to camp in the backcountry. Often these are free, and even when you have to pay for them, they’re rarely more than a few dollars. But you may have to reserve them well in advance.
Permit competition varies dramatically across the country. For example, in Great Smoky Mountains National Park, you can almost always get backcountry permits within a week of your trip. But if you’re planning to hike the John Muir Trail in California, permits sell out within hours of opening for the year. In national forests, wilderness areas, and other protected lands, you may not need a permit at all.
You’ll also need to consider parking and transportation. Are you doing a loop or out-and-back hike, where you’ll end at the same destination you start? If so, one car parked at the trailhead is fine. But some of the best backpacking trails are point-to-point, where you hike one way to a different destination. These require two cars or a commercial shuttle.
Be sure to look into parking safety considerations as well. There’s nothing worse than coming back from a backpacking trip to discover your car has been towed, ticketed, or broken into. In areas where vandalism is common, you can often park at a hiker hostel or other private land near the trailhead for a small fee.
5. Mental preparation – What will you do when things go wrong?

If there’s one certainty in the backcountry, it’s that something will not go as planned. All you can do is plan for a major crisis and hope for a small nuisance.
When you’re out in the woods on a solo backpacking trip, there is no one to help you if the worst happens. That can be frightening — but it’s honestly less of an issue than the fact that there is no one to gut-check your experience with. Are you getting a bad vibe from a camping area? Not sure what to do when the weather turns dramatically? Can’t tell if you took the right trailhead or not? These are all manageable issues, but it can be a lot more disconcerting to have them racing through your own head than to be able to talk them through with a trekking buddy.
I cope with these concerns by thinking through everything that could go wrong in advance, and then rationalizing their likelihood. Am I worried about meeting sketchy people? Well, it turns out thru-hiking the Appalachian trail is safer than living in most American cities. I look at a map and at AllTrails recordings to see where I’m most likely to get lost, to ensure I leave myself enough time to deal with that. I check the weather obsessively in the days leading up to a trip and identify backup campsites to use in a storm. Etc., etc. Because I’ve read so much about solo backpacking safety, when something makes me nervous on the trail, I’m able to think through whether it’s a real concern or whether I’m freaking myself out unnecessarily.
The other thing that’s helped me a lot with mental preparation is joining communities of other solo backpackers. Trail Sisters is a great place for women to meet other outdoorsy women. My local group includes several backpacking guides who I always ask for first-hand tips. If they raise concerns about taking on a particular trail solo, I rethink my options.
And for the record, that twig snapping in the middle of the night? It’s probably just a bear. And as long as you don’t have any food on you, it’s going to leave you alone.
Solo backpacking tips on the trail

You’ve trained, prepared, and researched to death. Now, all there is to do is start your hike. It’s going to be a great adventure!
Despite all the advance planning you’ve done, you can’t totally let your guard down on the trail when you’re hiking alone. You’ll need to pay attention to your energy levels, your safety, the weather, where you are, and more. Follow these tips to stay safe, warm, dry, and having fun.
1. Send someone your itinerary and leave it in your car
As anxious as you may be to hit the trail, it’s super important to pause for a moment and make sure someone knows where you are.
If you get injured or lost on the trail, you’ll want rescue teams to know where to look — and you’ll want them to be able to start the search as soon as possible. This is extra-critical in colder months, when hypothermia can set in within hours.
The best way to ensure you’ll be found is by leaving a detailed itinerary in two places: with a loved one, and in your car. By “detailed itinerary” I mean trailheads, parking spots, route details, campsite locations, and when you plan to be back. And once you’ve set it, do not divert from your plans.
I always send my itinerary to family and to a couple of trail-buddies who are on different schedules. By ensuring at least two people have my plans in hand, I feel secure that at least one of them will contact help if I don’t inform them that I’m back in time. (And leaving my info with trail-buddies means they “get it” when a hike takes an hour longer than planned, as opposed to family who might worry sooner.)
But it’s also smart to leave your itinerary in your car — in the glove compartment. In the event of an emergency, rescue teams know to look for it there, but you don’t have to leave it somewhere visible (where sketchy characters might be able to figure out where you’re camping).
Why leave your info in your car? Because your off-trail safety net might not know if something dangerous happens on the trail. For example, if there’s a major lightning storm that strands a bunch of hikers on a mountain, rescue teams might be able to start searching from your car itinerary before your family knows to contact help.
2. Eat a good breakfast

Backpacking is a ridiculously calorie-intensive exercise. Food is heavy. Therefore, to reduce food weight while maintaining energy on your first trail day, you might as well eat to your heart’s content before hitting the trail.
I usually eat an omelet packed with veggies and cheese, toast with nut butter, and some fresh fruit on backpacking days. This provides a good blend of protein, fats and carbs, but it’s still healthy and I know it won’t give me a tummy ache on the trail. Plus it’s my last opportunity to get fresh food for a couple days. I pair my breakfast with a nice big cup of coffee as well.
Some people hope to lose weight on their backpacking trips. You do not want to run your energy reserves too low on a hike, especially when you’re by yourself. Trust me, I’ve been there — you’ll just feel sick, hangry, headache-y, and miserable and it’ll put a serious damper on your trip.
You also probably don’t need to intentionally restrict calories to lose weight — there’s a good chance you won’t be able to eat enough to avoid losing weight, especially on a 3+-night trip.
3. Start hiking early to leave yourself plenty of time to reach your first campsite

The worst day of backpacking I’ve ever had was in Great Smoky Mountains National Park. I was trying to section-hike the Appalachian Trail through the park — 70 miles in 6 days. I had to drive out to the Smokies, catch a 3-hour shuttle, and hike to the first campsite before the sun set at 8 pm.
The first campsite was 10 miles in — normally a fairly easy five-hour hike for me. So when I set off at noon, I figured I was all good and could take my time.
The problems? I had not factored in the fact that my pack weighed almost 50 pounds, instead of my usual 30 (six days of food is much heavier than 2-3). I had not factored in that 10 miles covered over 3,000 feet of elevation gain. And I had not factored in a mile-long, steep side trip I’d need to make for water, since the only water source was well off-trail and I couldn’t hike 10 miles with two liters in July.
I ended up reaching the campsite by 8 pm — just barely. But doing so required me to speed well beyond the point of comfort. I didn’t take breaks, I pushed myself way too hard uphill, and I barely ate anything. I rolled into camp so exhausted I could barely make dinner or set up my tent. My feet and knees were killing me by that point — problems that got worse as I continued to hike 12-17 miles a day for the next five days.
The lesson here: don’t be like me. Give yourself more than enough time to reach camp well before sunset. I realistically should’ve started hiking by 10 am in order to have a comfortable first day on that trip.
4. Bring a way to entertain yourself

One of the only downsides of backpacking solo is it can get a little dull. You don’t have anyone to chat with to pass the time as you walk, or to play cards over a campfire with in the evenings. It’s just you and the woods. Which sounds lovely until you’ve been staring at the same sunset view for three hours, watching the sun slowly inch closer to the horizon, millimeter by millimeter.
The best antidote to trail boredom or loneliness is to bring some form of entertainment. I like podcasts — they pack light (since I’m bringing my phone anyway) and they work just as well after the sun goes down. Some backpackers prefer books, journals, or music. While I listen to a lot of true crime podcasts at home, I try to keep things a bit lighter on the trail to avoid freaking myself out. (Not a good idea: Listening to a podcast about bodies found in the woods while camping alone in the woods.)
While you’re walking, it’s not a good idea to have headphones in, and it’s disrespectful to other hikers and wildlife to play music or podcasts out loud. So look for other ways to amuse yourself. I like to take photos and try to identify plant life along the trail. Sometimes I’ll try to find some hiking buddies to walk with for a couple miles. Or — when all else fails, and especially when I’m in bear country — I’ll talk or sing to myself to let the bears know I’m there.
5. Eat before you’re hungry, drink before you’re thirsty

One of the cardinal rules of long-distance hiking is that once you feel hungry or thirsty, you’re already dehydrated or you’ve already depleted your energy supply. To maximize your enjoyment of your solo backpacking trip, get in front of hunger and thirst by eating and drinking consistently throughout the day.
I use a hydration pack to make sure I continuously drink along the trail. I’ll usually take a sip of water at least once every couple minutes. This approach allows me to drink 3-4 liters a day without feeling like I need to gulp down water at breaks.
I also try to take a break about every 90 minutes for a snack. My favorites include dried apricots, trail mix, fig bars, peanut M&M’s, and string cheese. I usually stop for a small-ish lunch (tortillas and tuna or pepperoni is my go-to), but sometimes I just keep snacking throughout the day.
If you want to avoid your muscles getting cooled down, try to keep breaks short. That hour-long lunch break may feel lovely at the time, but walking up a two-mile hill afterward is going to really suck.
As soon as you set up your tent at camp, make dinner. This allows you to finish cooking and eating before prime bear hour, plus you’ll get some protein quickly to make it easier for your muscles to recover. I take Mountain House dehydrated meals for dinner.
Women should aim to eat around 3,000-3,500 calories per day on the trail, depending on your weight, pack weight, and distance hiked. It’s more food than you think — measure it out beforehand to make sure you pack enough. For your first backpacking trip, it’s better to carry a little more weight and end up with leftover food than skimp on the food and end up starving.
6. Navigate carefully

Some trails — like a weekend backpack on the Appalachian Trail — require almost no navigation skills. Just make sure you see a blaze every quarter mile or so and you’re good.
But on other trails, if you take a wrong turn, you could end up miles off-route before you realize it. This is especially true in wilderness areas, where trails are not marked and terrain can be very rugged.
So as you’re hiking, stop every couple miles to verify that you’re still in the right place. Whenever you reach an intersection, triple-check your map or GPS to ensure you’re going the right way. And if distances or landmarks seem off to you, trust that instinct!
This is where AllTrails comes in super-handy. You can use it to trace exactly where you are relative to your planned route, and if you end up off-trail, it’s easy to use it to retrace your steps. But you should always bring a paper map and compass as backup (and know how to use them).
Safety tips for backpacking solo

If there’s one thing stopping more women from getting out in the backcountry alone, I’d guess it’s concerns about safety. To some extent those concerns are legit. After all, if something happens in the wilderness, there’s no one to get you out of that situation besides you.
Other hikers are most people’s primary worry. But for a bit of perspective: In the last year alone, I’ve done nearly 100 solo hikes. I have met exactly zero sketchy people on the trails. Maybe I’ve just been lucky, or maybe Appalachia is uniquely safe — but more realistically, there just aren’t that many shady characters lurking out there.
It’s good to think through what you’d do if you meet someone dangerous, but you’re far more likely to be at risk of injury or a wildlife encounter than a human. These tips can help you prepare for a variety of surprises.
1. Don’t tell people you meet on-trail where you’re camping
While other hikers present a relatively low risk, it’s still not a great idea to go around advertising the fact that you’ll be sleeping alone in the woods.
On social trails like the Appalachian Trail, you may encounter many other hikers who are curious about your route. It’s fine to share some vague details, especially if you’re looking for intel from people traveling the opposite way. But don’t name the specific spot you plan to camp at.
A few good lines to protect your vagueness: “I’m just going to find a campsite when I get tired,” or “I’m camping somewhere near [[mountain or landmark]] but I want to wait and scope out the spots when I get there,” or “I don’t remember the name of the shelter off the top of my head, sorry!”
Alternatively, you can outright lie about where you’re camping. I did this once when I met an obnoxious group of college kids asking me about good campsites. They weren’t dangerous, but I definitely didn’t want to be anywhere near them at camp. So I told them I was headed to a (quite unremarkable) spot and instead went to a spot with a panoramic view.
And if you meet anyone who really sketches you out, feel free to be even more vague. Sometimes this can feel awkward or rude. But if there’s one thing I’ve learned from a decade of traveling the world alone, it’s that no amount of politeness is worth your safety, and the only one who is looking out for your safety is you. Don’t compromise if you’re getting bad vibes from someone.
2. Carry a personal locater beacon

If you’ll be hiking in truly remote areas, a PLB can be a worthwhile investment. These devices serve as GPS trackers that can call emergency rescue teams in case of an emergency.
The top pick PLB is the Garmin In-Reach. It’s reliable and you can use it in even the deepest backcountry. But it’s also very expensive, and for most people, it’s a bit overkill. (For instance, on the East Coast of the U.S., you’ll never really be so far from a road or other people that you need something this sophisticated.)
If you’re looking to save money, consider using the Lifeline feature on AllTrails instead. It doesn’t have all the features of the Garmin, and it wouldn’t be suitable for, say, remote backpacking in Wyoming. But for Appalachia it’s totally sufficient.
Alternatively, keep it super low-tech and just bring a whistle or air horn. Three short blasts is the universal call for help. As a bonus, they tend to spook people and bears who aren’t expecting it.
3. Pack basic first aid supplies

The most likely thing that will go wrong when you’re solo backpacking is you could get injured. This could be a minor injury like a blister, or it could be something much more serious like a broken bone. Since you’ll have no one with you to help you reach medical attention, you need to carry enough first-aid supplies to deal with most backcountry mishaps.
My backpacking first aid kit is super simple: band-aids, duct tape, two ace bandages, and disinfectant. (Duct tape works way better than band-aids for blisters.) You can get more extensive kits, but honestly I’ve never seen the point. The most basic tools are what will help in the event of a serious injury.
If you have specific allergies or sensitivities — like if you’re allergic to bee stings or get very severe reactions to poison ivy — bring the requisite treatments. Pack any medications you take regularly as well.
Some of my backpacking buddies won’t leave home without an over-the-counter painkiller (like ibuprofin). Personally, I prefer not to take anything like this. If something on my body hurts when I’m backpacking, I want to be aware of it early and take it as a sign to ease up. If you take ibuprofin for sore muscles so you can push on for more miles, you aren’t doing any less damage to your muscles, you’re just masking the damage you’re doing.
I also always carry a multi-tool (which has scissors and knives), sunscreen, lip balm, and hand sanitizer.
And if you think this sounds like pointless extra weight, take it from me: A small slip on ice with 35 pounds on your back can be very painful when you stop your fall with your pinky finger. You’ll definitely want some duct tape to deal with such things. (Yes, I use duct tape for everything. Don’t pack the whole roll; just wrap enough for a couple days around your lighter or multitool.)
4. Practice bear safety when camping in bear country

After a trail-related injury, wildlife is probably the second-biggest threat when you’re backpacking. It’s not so much that the wildlife will hurt you. It’s more that the wildlife will steal your food, leaving you starving with 30 miles to walk back to your car. Not good.
In North America, bears are the typical wildlife threat. In the East you have black bears, and out West you have both black and grizzly bears (which, confusingly, can both be brown).
Black bears are extremely unlikely to attack humans, but extremely likely to try to steal your food when you’re not paying attention. The best way to deter them is to pack your food and everything that smells like food (toothpaste, wrappers, sunscreen, etc.) in a bear canister at least 70 large steps away from your campsite. You can also hang your food on bear cables where they’re provided.
If a bear tries to investigate your dinner, make a lot of noise and try to appear as big as possible. It’ll almost definitely run away. Similarly, when you’re hiking, bears are only a risk if you surprise them — so make lots of noise like singing and talking to yourself to alert them to your presence.
In the extremely rare case that a black bear starts to charge, fight back. Never play dead with a black bear.
Grizzlies require an entirely different set of safety protocols. I’ve never backpacked in grizzly country, so I’ll point you to this great resource to get familiar with what to do.
In addition to knowing common bear behaviors, always pack bear spray when backpacking in bear country. This could save your life in the event of a bear attack — but it’s useful for other things too. For example, if you run into anyone sketchy on the trail, bear spray is far stronger than pepper spray. Just sayin’…
5. Know your bail-out points

When you’re on a solo backpacking trip, there is no shame in going home early. Whether you get hurt, or you get bad vibes from a campsite, or you’re just not having fun, sometimes you need to get off the trail before you planned.
This is when it’s crucial to know where you can access a road and call an Uber.
When you’re planning your route, do some research into where you can get off the trail early if you need to. I like to identify viable bail-out spots every 3-4 miles.
I would seriously think twice about doing a backpacking trip by myself on a route with no options to bail. I’d be so nervous about breaking a leg and having to hobble 20 miles back to my car that I wouldn’t be able to enjoy myself. You may have a higher risk tolerance, but it’s important to think through where your limit is.
6. Wear orange (or bright pink) in hunting season

Autumn is a beautiful time to go backpacking. The days are still long and warm-ish, the nights are crisp, the weather is clear. But it’s also the time of year when you’re most likely to encounter hunters in the backcountry.
Always check local hunting regulations before setting out on an overnight trip. If you think there’s a chance you’ll encounter hunters, wear blaze orange or neon pink for safety.
If you backpack alone with your dog, make sure they wear orange too! Being on a leash near you isn’t enough to keep them safe.
An unfortunate additional danger during hunting season is nail traps set by animal rights activists. Be on the lookout for them if you hike in popular hunting areas. Regardless of how you feel about the ethics of hunting, I think we can all agree that no one wants to step on a nail trap.
7. Trust your gut – and don’t take stupid risks

Finally, regardless of what you encounter on the trail, if something just doesn’t feel right, don’t ignore that instinct. It could be a campsite that gives you creepy vibes. It could be an overly friendly fellow hiker. Or it could be thunderclouds rolling in a little too close for comfort.
Any experienced solo hiker or backpacker has at least one story of a time they turned around or packed up and moved on because they got bad vibes. For me, it happened on my very first backpacking trip on the Art Loeb Trail. The trail runs across a very exposed ridgeline. I’d checked the weather obsessively in advance and it all looked clear. But on my last morning, something told me I’d want to move fast.
So instead of taking my time to traverse the narrow, steep, rocky ridge, I rushed along as fast as I could safely go. I didn’t stop for photos and I didn’t even stop for lunch. The sky stayed blue — to an outside observer, I would have looked totally paranoid. That is, until I made it below the ridge, on to the last mile of trail, when a massive thunderstorm slammed the mountain I was on. Lightning hit the ridge above me where I’d been hiking just an hour earlier. The entire trail flooded and the rain was so thick I couldn’t see the trail. If I’d been just a little slower, I would have been in quite a dangerous spot. Instead, I got to have one last picnic in my car while watching the river flood from the parking lot.
The flip side of this rule is if you know something is risky, your first solo backpacking trip is probably not the time to try it. Want to rock scramble up steep ledges? Great — bring a buddy. Want to try a deep river crossing? Great — bring a buddy. Want to do a nighttime hike up to a sunrise viewpoint in January? Great — bring a buddy.
As you get more comfortable in the backcountry, you’ll be able to take on more adventurous stuff. Improvising when things go wrong will become second-nature. You’ll also have a healthier respect for just how quickly the mountains can get dangerous. All of these things will allow you to better hone your risk tolerance. But in the beginning, if you’re in doubt about the safety of something you want to do, ask yourself: how dumb would the search and rescue team think I am if they have to come get me out of this mess?
Some final tips for backpacking alone for the first time

- I didn’t include any of my gear recommendations because this post got stupidly long already. But basically: wool clothing, lightweight tent, three-season sleeping bag, inflatable pillow, MSR pocket rocket stove, bear canister, tons of food. That’s it. None of it needs to be expensive ultralight stuff for your first trip (or, really, ever, unless you’re planning a thru-hike).
- As ambivalent as I am about gear, I have very strong feelings about backpacks. I will never hike with anything other than this Gregory women’s pack ever again. For best results, get fitted at a local outdoor store.
- I also have very strong feelings that every backpacker should use trekking poles. They take as much as 30% of the weight out of your knees — which really matters when you’re carrying your body weight plus 35 pounds of gear and food.
Curious about Southern Appalachia? The best solo backpacking trips in Western NC, Eastern TN and upcountry SC, in order of least-most difficult, are:
- Carvers Gap to Highway 19E on the AT: The most view-packed backpacking trip I’ve ever done. It’s about 20 miles and almost all downhill. Camp at Little Hump or Hump Mountain for views, or Overmountain Shelter for the social scene.
- Devil’s Courthouse to Sam Knob on the Blue Ridge Parkway: Views, waterfalls, a river, good water access, balsams — this 12-mile loop has everything. Park at Black Balsam Knob to maximize downhill on your last day, and camp on the hard-to-find north summit of Sam Knob.
- Sam’s Gap to Big Bald and back on the AT: 13 miles round-trip, with two good shelter options on the balds. Not too crowded, with incredible wildflowers in spring and lots of wildlife.
- The Foothills Trail: It’s long at 77 miles, but most of it is fairly flat. You’ll have 1-2 very challenging days but even newer hikers have no trouble knocking out the first 16 miles from Oconee State Park in a day.
- The Art Loeb Trail: Go south-north for a challenge. It’s 31 miles and takes about 2.5 days at a solid pace. Six miles of totally unobstructed panoramic views along the ridge. Camp on Black Balsam or Tennent Mountain. Water is very scarce — carry 4 liters.
- The Appalachian Trail through the Smokies: 72 miles and a full week of hiking. If you want to cut it in half, the Newfound Gap – Davenport Gap stretch is the most beautiful and takes you to incredibly remote parts of one of America’s most-visited parks. You’ll see bears, deer, turkey, wild hogs, critically endangered salamanders, and possibly elk.
- And finally — although not a good first-timer’s trip — the Linville Grand Loop: 40 miles with a deep, fast, wide river crossing, extremely rugged terrain where you must be a confident map-and-compass navigator, and 10,000+ feet of climbing in three days. This is one of the hardest backpacking trips in the country and it’s only suitable for experienced adventurers, but it’s unparalleled on the East Coast.
Like this post? Pin it!

Read more about outdoor adventures here
These are great tips! I’ve never been one who thought I’d be into solo backpacking but your pictures make me want to consider it. 🙂
Haha yeah, one of my favorite parts is that you get to be on the trail both at the very earliest hours of the morning and at sunset, so you get alllll the good light for photos.
This is so helpful! I would love to take a backpacking trip. I love to hike and car camp but haven’t quite made it to backpacking yet.
You could totally do it! I’d never been before this year, but it’s a super addictive sport.
Excellent article. You have completely nailed it. I’ve done tons of outdoor solo trips and found this such a useful overview. I really like how you acknowledged your privilege in the outdoors too. The only thing I would add to this list is first aid training and a few more first aid supplies.
Yeah, I really should probably take some first aid training. It’s on my list when the pandemic is over!
Wow, 3500 calories sounds insane! But when I think back to my trek from Fairy Meadows to the Nanga Parbat basecamp, I remember eating so much chocolate just to keep myself conscious lol. Anyhow, your post is super super useful and it really made me crave the outdoors again!
Hahaha yesss chocolate is the best hiking snack. I seriously never leave home without a snickers bar or pack of Peanut M&M’s.
These are such great tips! I hike solo but haven’t taken the backpacking solo plunge but I certainly appreciate the encouragement.
You can do it 🙂 🙂
These are great tips! I’ve done several solo hikes but I have yet to go backpacking. I’ll definitely reference your post if I plan a solo backpacking trip in the future!
Thanks so much! It’s really not that different from solo hiking 🙂
I’ve been backpacking by myself a few times and loved it. I didn’t come across any problems, and would definitely do it again in the future.
Glad to hear you had good experiences!
What a great post with relevant tips! I will certainly be referencing for future hikes! Thanks for sharing!
Thanks so much — happy hiking 🙂